• Skip to main content
  • Skip to primary sidebar
Oh So Busy Mum
menu icon
go to homepage
  • Recipes
  • Travel
  • Disney Travel
    • Facebook
    • Instagram
    • Pinterest
    • TikTok
  • search icon
    Homepage link
    • Recipes
    • Travel
    • Disney Travel
    • Facebook
    • Instagram
    • Pinterest
    • TikTok
  • ×
    "Home" » Lunchbox Recipes

    2 Ingredient Ice Cream Bread

    May 5, 2020 by ohsobusymum Leave a Comment

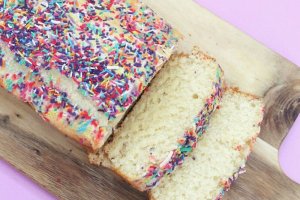
    Can you believe you only need 2 ingredients to make this tasty ice cream bread? My kids can't get enough of it. I know it might seem strange using ice cream to make bread, but it makes it fluffy, sweet and the perfect texture. A few years ago I found a recipe online for ice cream bread and made it for the first time and I totally forgot about it until recently when my older girls asked me to make it again. It's so easy to make, even the kids can make it! 

    Tips

    • Full cream ice cream works best. I have tried to make it with dairy-free and it didn't work as well with a dense bread as a result. 
    • You can top it with anything you like. I included sprinkles in this recipe, but you can make it chocolate chips, fruit or just leave it plain. 
    • Try strawberry ice cream with some fresh strawberries added to the top for something different! 
    • If you like your cakes or bread sweeter, add ¼ cup of caster sugar to the mixture. I find it doesn't need the extra sweetness when you add sprinkles to the top and use a good vanilla ice cream. 

    Ingredients 

    • 2 cups vanilla ice cream (I used the pauls ice cream brand)
    • 1 ¼ cups self raising flour  
    • Optional toppings: I used sprinkles, but you could use chocolate chips, dried or fresh fruit. 

    Directions 

    1. Mix the ice cream in a bowl for a few minutes until melted and creamy. 
    2. Add self raising flour to the ice cream and mix until combined. The mix should be thick, with all the mixture mixed in. If it's still a little dry, add another scoop of ice cream. 
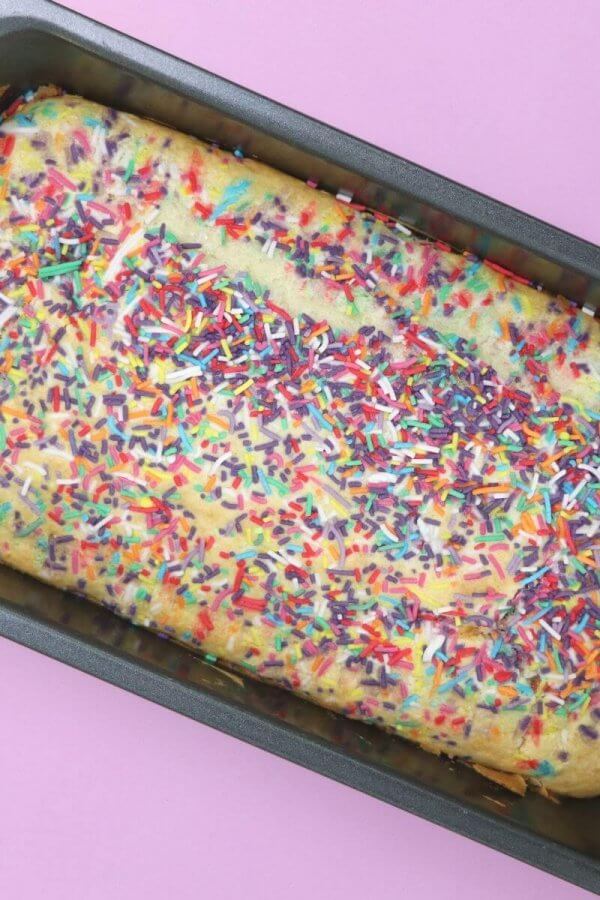
    3. Pour mix into a bread or loaf tin and add your toppings to the top of the batter. 
    4. Bake on 170°c for 30-35 minutes or until a skewer comes out clean from the centre of the bread. 
    5. Allow to cool before slicing.

    This bread is best eaten within 24 hours and stored in an airtight container in the fridge. 

    More Lunchbox Recipes

    • Cottage Pies in Taco Boats FI
      Cottage Pies in Taco Boats
    • Taco Boat Quiches
      Taco Boat Quiches
    • Easy Chocolate Tray Cake Feature
      Easy Chocolate Tray Cake
    • Berry Slice
      Berry Oat Slice 

    Reader Interactions

    Leave a Reply Cancel reply

    Your email address will not be published. Required fields are marked *

    Recipe Rating


    Primary Sidebar

    Popular Posts

    • Grand Mirage Resort Bali Review - Oh So Busy Mum 1
      Grand Mirage Bali - One of our favourite resorts!
    • Crispy Bacon and Cheese Potatoes FI
      Crispy Bacon and Cheese Potatoes
    • Savoury Smores FI
      Savoury S'mores
    • Homemade Banh Mi recipe
      Homemade Banh Mi recipe
    • Spinach Ricotta Stuffed Pasta Shells
      Spinach Ricotta Stuffed Pasta Shells
    • Brooki Bakehouse Style Cookie Recipe FI
      Chunky Chocolate Chip Cookie Recipe
    • Fairy Bread Melting Moments FI
      Fairy Bread Melting Moments
    • Easy Caramel Slice FI
      Easy Caramel Slice

    Family Travel

    • Drury Plaza Hotel – Disney Springs Area Review
      Drury Plaza Hotel – Disney Springs Area Review
    • Our Disney World & Orlando Itinerary
      Our Disney World and Orlando Itinerary 
    • All Stars Music Resort, Disney World Orlando
      All Stars Music Resort Review, Disney World Orlando
    • Disney World Oh So Busy Mum
      How much did it cost to take my family of 5 to Disney World from Australia?
    • Bali Beach
      Bali Entry Requirements
    • dvc points Aulani
      What are DVC points?

    Footer

    ↑ back to top

    About

    • Privacy Policy

    Newsletter

    • Sign Up! for emails and updates

    Contact

    • About me
    • Contact
    • Work with me!


    Copyright © 2025 Oh So Busy Mum


    300 shares